Friday, March 1, 2013

Spring Mantle!

I'm trying to get back into the swing of things with some fun decorating for spring! I'm easing back into blogging after becoming pregnant. The first half of my pregnancy was difficult as I wasn't feeling so great and honestly my focus was elsewhere. But I have done several projects, mainly for my daughter's new big girl room, that I'd like to update you on. I thought I would start out simple with a fun little spring mantle makeover! So without further ado...


What do you think? I actually used things I already had around the house. And a few things I had ordered last spring on sale, like the eggs in the apothecary jar from Pottery Barn. I found the bird's nest, tray, and green mossy balls at Outrageous Interiors not too long ago. I picked up the finial at an antique store for around $10, I believe. The giant "L" and clock came from Hobby Lobby. The pitcher and flowers were from a previous mantle arrangement I did here. I've had the apothecary jar and large mirror for a while and they are from Z Gallerie. The stand, glass dome, and circle mirrors are from Willow House. Here are some more views for you:


Hope you enjoyed my short, but sweet post. I had fun arranging and rearranging everything to come up with this busy bit of spring goodness! What's your favorite and least favorite thing about it? My husband despises the tray behind the clock, but I find it charming.

Sunday, September 23, 2012

Fall Wreaths!


I want to share some fall wreaths I made recently. Because well, it's fall y'all! Sorry. I couldn't resist. I'm in a local moms club and I recently organized a craft night! We had a lot of fun. But I wanted to make sure I had an idea of what the cost would be, how much time it would take to make it, and how it would be put together. So I headed out to Hob Blob (Hobby Lobby) - my favorite store ever. I was picturing something simple, but cute so we could put it together easily, while socializing, in a reasonable amount of time. At first I thought a yarn wreath with rosettes would do the trick. But after thinking about it some more and wondering how much yarn we would use and how long it would take I wasn't so sure. Then I stumbled upon this wreath here on pinterest. It is simply wrapped in fabric; quick, easy, and cute! I loved the idea. I really liked the fabric she used, but was looking for something more "fallish" as opposed to Halloween.


Here's a shot of all the goodies I picked up at Hobby Lobby. Sorry the fabrics are hard to see because they are sitting in the bottom. I selected a good assortment of fall looking fabrics and bought a yard of each for making the rosettes. And I found two fabrics that would be good for wrapping the whole wreath. So I bought 3 yards of each of those.


Before I started on the wreath I painted my "FALL" letters with craft glue and added orange glitter. Looking back, I wish I had done brown because I think it is too much orange for the wreath and they don't quite stand out. But that's one reason I was making a trial wreath! That way people could see what they liked and didn't like and do their own version. 


For my sample wreath I chose the brown and orange fabric for wrapping the whole wreath. I kept the plastic on the straw wreath to keep things neat. I had my scissors and tacky glue handy for the next step.


First, I laid out my fabric and started cutting about 2" strips from the longest side. My large sized wreath took about 2 1/2 strips to cover.


Here it is all covered up. I just wrapped it as tightly and neatly as possible. When I was at the end of a strip, I used my tacky glue to glue it in place. You could probably start wrapping a new strip without gluing, but that's the technique I used.


Next, I made the rosettes. You can see a tutorial on how to make them here. After that I hot-glued them onto the wreath along with some fall decor items such as the pumpkin, orange sprigs, pine cone, and acorn. Then I hot-glued my "FALL" letters. Lots of glittery goodness! Last, I cut a 4" piece of the brown fabric, folded it in half, and tied it in a knot to hang the wreath.


I decided to add one last finishing touch...the pearl stickers in the center of the rosettes. I painted these with craft glue as well and added orange glitter. I used them in another rosette project here so they were a good buy! Not sure it makes that big of a difference on the wreath, but I like a little extra sparkle!


Do you see the difference?


Oh and here's one from our Mom's Craft night! I love how they are all different. Oh and I decided to make another one as well:-) You can never have too many fall wreaths, right? This time I made a smaller one and went with the brown fabric. It's a little more simple. I like them both though. I like different things about each one. Here's a close-up of my other wreath:


What do you think? Which one do you like better? Are you making a fall wreath this year?

Friday, September 7, 2012

My Stenciling Project

When I finished this project I wanted to shout it from the roof tops! It. was. hard. I want to be upfront with you, but like most things that are hard...it was worth it!! I'm so excited and pleased with the outcome. I've been wanting to try stenciling and I absolutely love it! But I think it will be a while before my next project ha ha. Without further ado...


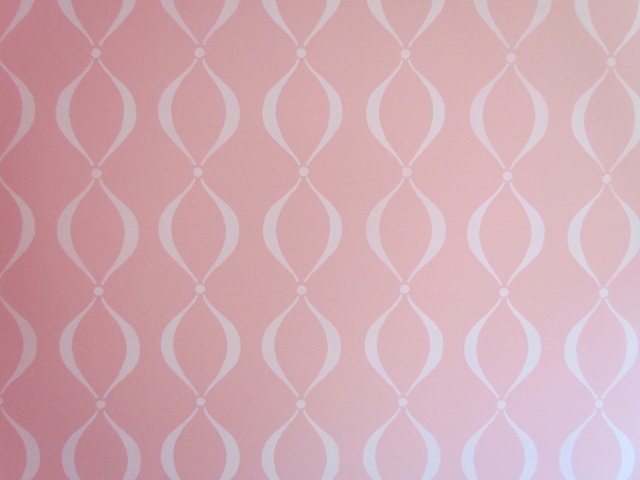
What do you think? This is in my daughter's new room so I wanted something girly and sweet, but nothing too bold because I wanted it to flow well with the rest of the decor. For instance, I thought about doing a damask stencil but was afraid it would clash with window treatments, bedding, etc. So I like how this one is simple, but elegant.


Here's a shot of the whole wall...yes, I used a stencil for each one of those suckers! I suppose you could make a stencil with several designs on one to save some time, however, it may be harder to line up and adjust. And you'd have to find larger stencil film. I chose to do an accent wall...I think doing the whole room would have killed me. But there are crazy people out there who do...like these folks here who I got the idea from! Just kidding...they're not crazy, props to this woman's husband for his very hard work!


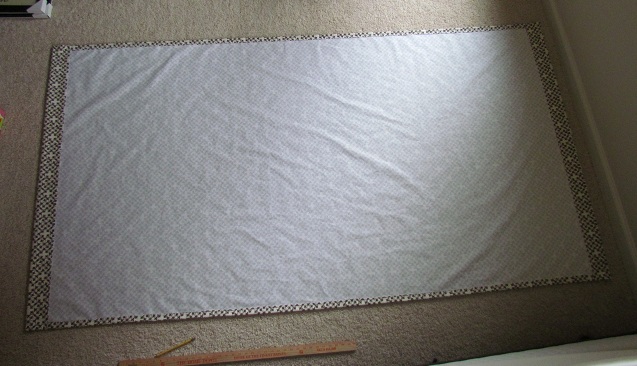
Please ignore the weird blank stare on my face here, lol. I'm telling you...hard work. I guess I was in a daze for a second? Any who...this is a good shot of the actual stencil. I didn't bother putting together a tutorial for making the stencil because there are some excellent how-to videos by Pottery Barn on You Tube.


The blog I got the idea from had a printable, which I printed but it was on an 8.5x11 so it was not as big as theirs. So if you are good at resizing and have larger print sizes to work with you won't have any trouble. But since my feeble attempt at resizing didn't work I decided to draw a bigger version.


Stencil Lowdown:

I sketched the design on a larger piece of drawing paper. Then I took my Martha Stewart stencil film (purchased from Michael's at $9.99 for a 3 pack) and followed the directions, basically just peeling off a clear cover. Then I taped it to my board cutter (technical term?) with painters tape. Next, I taped my drawing on top and cut through my design (very carefully) with an X-Acto knife. Again, sorry there are no photos of this process, seriously, you tube videos!! As you can see in the above picture I was about 1/3 of the way through my stenciling. Just a heads up...this wall took 3 stencils!!! Yes, I had to make 3 of them. The reason being that after using one for a little while the paint would build up, coating it so bad it started looking messy (no clean, crisp lines like before). At first it seemed like I could just touch it up, but it kept getting worse. So I made a new stencil to solve the problem. I'm not sure if part of the problem was the type of stencil I used (perhaps it is intended for craft use)? I'm guessing the stencils you can order online (if you don't want to make your own design) would last a lot longer.


Ok, back to the wall. Since I'm not math whiz measuring and figuring out spacing was challenging. However, I feel like I got really lucky and the spacing worked out perfectly. I did measure and eyeball, but it seems like how I envisioned them spaced (having them be whole and even across the wall as opposed to getting cut off on the sides of the wall) just worked out in my favor (thank you Lord!). I thought the top of the wall was the hardest until I got to the bottom of the wall, lol. They were both challenging for different reasons. The top of the wall was vital as it paved the way for the rest of the wall. I started by measuring my design and loosely measuring along the wall to see if I would have room for however many whole scallops (that's my name for my design). Then I stenciled two on the ends and one in the middle and went from there.


As you can see here I measured the length of each design and then added a couple inches for spacing in between. I didn't make pencil marks or anything...just lots of eye balling and adjusting of the stencil. Time consuming! Measure twice, paint once. Well, you can touch up too!;-) Also, notice in this picture how the stencil film is lined up. Part of the very top is on the ceiling. I wanted to get the paint/start of my stencil as close to the top of the wall as possible.


The bottom was difficult because I was only using half of the stencil and the base boards were a bit of an obstacle as were the outlets. I really like how it disappears into the bottom of the wall though:-) I wondered if I should have done that with the top? Owell, I'm happy so let's not go there! The trick to the bottom is lots of painters tape...over the outlets and on the trim/base boards. I lined up my stencil just like before and painted as much of it as I could with the small roller brush. After that I used a circle foam paint tool (Martha Stewart as well) to fill in the rest with a dabbing/blotting motion (kind of like sponge paint?). However, I would suggest getting a short stubby flat paint brush/stencil brush like the You Tube videos suggest. I honestly forgot about that part and just used what I had. Luckily, it worked nicely! Oh and last, but not least was touch up time! I just went back with my wall color and touched up any bleeds/splotches with a small artist paint brush.


As far as timing for this project...I worked on the wall two different days. The first day it took me a few hours and I got about 1/3 of the way through. Then I worked on it another day and it took me about 6 hours. Hopefully that will help in planning/scheduling your project!

Ok, so there you have it! Like I said, lots of work, but lots of enjoyment as well. And hopefully my post will provide some helpful tips or at least help you know what you're getting into!;-)

Monday, August 20, 2012

Rosettes

I've been into making rosettes lately. They are fun, easy, and super cute! It all started when I made my daughter's flower girl headband for my sister's wedding. It turned out just as I had hoped it would! Here it is along with one precious flower girl:-)


So for my next rosette project I decided to make some to dress up my plain lamp shade in the living room. I used silky ribbon to make the headband and fabric for this project. Here is the link to the tutorial I used to make the headband: http://alisaburke.blogspot.com/2010/12/holiday-hair-band-tutorial.html. And I used the same strategy for the lamp shade rosettes. I'll give you my version as well.


I started out by cutting three strips of fabric about 2" wide (does not have to be exact) and a little over a foot long.


Next, I folded them in half and hot glued them together.


After that, I tied a knot at the end of each one.


Then I began wrapping the fabric around the knot, twisting as I went. Also hot gluing sections here and there {more on that in a minute}.


Sorry for the dark photo. Here I'm showing a section I'm about to glue down. I put the hot glue behind the front of the rose and press the new piece down. This technique ensures no messy hot glue will be showing. But be careful not to burn your fingers!


And there you have it! A cutesy little rose! Oh yeah, and just glue the end piece to the back of the rose so it doesn't stick out.


I made two more and glued them all together. I also had some pearls leftover from the headband so I stuck those in the middle of each one. I liked the look, but did not like how they sat on top. I would have preferred to nestle them down into a fold, but then they wouldn't have been centered {more on how I solved this problem later}.


I hot glued them onto the lamp. I wasn't sure how I wanted to attach them...I wanted something temporary in case I wanted to take them off someday. But I also wanted them to stick on there well so I went with hot glue in hopes that if I ever take them off I can peel it away and no one will ever know (except you, of course!).


Not sure if you noticed, but the top rosette is made from the same pattern as my curtain panels! I wanted to tie them in together, but didn't want to use it for all 3 because I didn't want it to be too matchy matchy. What do you think? I love how this project only took me about an hour and gave my shade an upgrade!

{Pearl Update}


If you look closely, you may be able to notice a difference in the pearls from this shot compared to the close-up above. It's not that noticeable, but I like these new pearls better. They are actually stickers. What I like about them is they are flat on the back (essentially cut in half). So I took the old ones off and glued these new ones on with tacky glue. They are so small I didn't want to burn my fingers with hot glue.


Here they are...Martha Stewart stickers. I bought them from Michael's for $4.99. So they weren't cheap, but remember you can always use your 40% coupon.

Sunday, August 5, 2012

Easy Curtain Panels

I had some off white curtain panels hanging between the windows in my living room. I loved them when I first got them, but after a while I thought something a little more bold would look good. I thought about a pop of color, but decided to stick with something neutral (like the rest of my living room) so it wouldn't clash with the kitchen. I chose a print I liked...I was a little nervous at first, but love how it turned out!! Sometimes being a little daring pays off!

Here's a tutorial on how to make them:

**Side note: I did not line my curtains because they were going in front of a wall. If you plan to make panels that will cover a window, you will want to line them.

I cheated and started off by laying my old curtain panel on top of my fabric:


I measured 3" out from the top and bottom for the hem.


And a couple inches on the sides. I pretty much just trimmed the selvage off and it left an inch or so for the hem. Here it is all cut out:


Next, I pinned one side...


And sewed from top to bottom. I'm showing my inexperience here, but I wanted to have a clean line and keep it straight so I sewed with the fabric facing me, making sure I had enough room on the back so the stitches wouldn't miss the fabric. It worked fine, but I had excess fabric on the back (sticking out after the seam). It didn't look very clean. I could have trimmed it, but I knew it would not show so I left it alone.


After sewing the sides, I folded and pinned the top down (allowing for a 3" seam). I sewed all the way across (even over the side seam). I used my old panel as an example to see how to sew the seams and in what order.


This is what the back looked like when I was all done...


And then I made another one! As you can see in the picture below I already had a rod with rings to clip on the curtain. But since I sewed a wide hem at the top I could have strung it through the rod as well. If you go that route, just keep in mind what length you want it/where you want the bottom of the curtain to hang. This was a pretty easy project and I love the difference it makes in our living room!! Check it out...

Before:                                                           


After:


From drab to fab with two easy curtain panels!! I think adding some color and pattern has warmed up the room, making it even cozier!:-)

Thursday, August 2, 2012

Cluelessly Planting: Update!

If you recall my first 'Cluelessly Planting' post here...I was experimenting with different plant recommendations for indoors and outdoors. This update won't take long; none of them made it. Yes, it's true. I really do have a black thumb!! But I'm not ready to give up yet. And I'm 99% sure this bad boy on the right would have made it if my husband hadn't tampered with it...


The Ivy - Variegated Large Leaf Periwinkle/Vinca did awesome and lasted through the winter (although it was a mild one), but the Perennial - Mary Ann Lantana died (as expected), which was fine because I wanted to see if it would come back like it should. Well my husband wasn't aware and took it upon himself to replace the Perennial with another flower and stuck another plant in there as well. However, I didn't know he had added the plant because it looked a lot like the Ivy I had in there. Eventually his flower died too and his plant took over (killing my Ivy) and started growing upard, giving me a clue something was up (literally haha). All that aside, I would have to say the Ivy - Variegated Large Leaf Periwinkle/Vinca was the best as far as low maintenance and staying alive and all!


Although my plants didn't make it, I did learn some things. Mostly what not to do, but at least it will help me in the future. You have to start somewhere! A couple lessons I learned were; having my indoor plant where I would remember to water it was good, but I think I watered it too much and I found out my front yard is not such a good spot for potted plants because it gets direct sunlight all day long.

Side note: I thought you might be interested to know the red pot (remember how I spray painted it here) and the yellow pot (pictured at top) chipped when I had them outside (I moved the red pot outside after the Ivy died). They did not stand up to the weather. I was surprised because the red spray paint was for indoor/outdoor use and the yellow pot was from Marshall's. I guess I'll have to be more careful when choosing painted pots for outdoors? Any tips?


{A little less} Cluelessly Planting Round 2!

Spring and Summer have sprung (I'm a little late with this post) and so has our plant collection! This time I set out to Home Depot hoping to save a little $ and just sort of dove in without any expert advice. And it's really nice because they have everything laid out plain and simple so it's easy to understand. For example; which plants need shade, sun, part sun, house plants, etc. So here's what I came home with:


The two on the ends were potted already so I just stuck them out there to look pretty. The one in the middle I potted myself. The pink and purple flowers are Annuals and the yellow flowers are Marigolds. The lady at the register told me once the Marigolds die, you can snap the tops off and they will grow right back! And from what I've seen so far, she was right! I love Ivy, so I thought I would try a different kind. I came home with English Ivy. I loved it and saw it on display at Home Depot so I wanted to give it a try. I used their example to get some ideas. The English Ivy says "partial shade", but they had theirs in direct sunlight so I tried it out in the sun. Well, a couple weeks later it was starting to turn yellow and wasn't growing so I re-potted it and put it in the shade. Now it is thriving!!

                    May                                                  July


Here are some updated pictures of my pot o' flowers after removing the English Ivy. It is doing great!

                   May                                                  July

                                    
I am glad to have some good news for you! And wait...there's more!

Coleus:


Another plant I decided to try is Coleus. My SIL highly recommended it and said it is very low maintenance so I was sold! I love the bright colors...from what I saw you can get them in green, purple or both (like mine).


Here's some advice if you are going to plant Coleus...they are very tender so be careful! I was telling my Dad about buying some and he said "Oh are those the really tender ones?" and I was like "I don't know?". But after planting them, sure enough, one of them just snapped right in half. If you look closely, you can see in the above picture how a big chunk of leaves is missing from the top-right plant. I planted it in hopes it would grow back or maybe the other two would flourish and no one would be able to tell. Grow back and flourish it did!!! Check out the difference a few months makes! This picture was taken recently. I guess they bloom this time of year...you can see two sprouty things (yes, that's the technical term) at the top if you look closely.


Even more good news! Looks like my SIL was right!:-)