Monday, August 29, 2011

Mantle Makeover

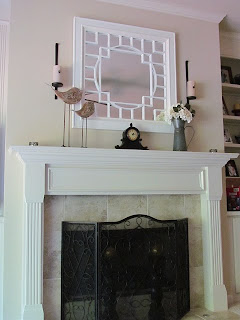
I recently redid my mantle. Here is a before picture from a few years ago. I thought this embarrassing picture of me proudly displaying it would work just right. I think my sister and her now fiance are looking at me thinking I'm crazy! Well anyways, take a look at the mantle. Really all it entails is the mirror leaning against the wall and the two tall candle holders on each side. I used to really like it, but it looks kind of plain to me now.

Before:


After:


So here is the after pic, what do you think?? I think it definitely has more personality now:) Here's what I did! Despite my fear of hanging such a heavy object, I decided to hang the mirror on the wall. My wonderful father-in-law did this for us! And it did not look easy so I'm super grateful. It required some special hardware, but it was not difficult to find. You can go to Lowe's or Home Depot. Oh and here's a shot of my daughter having some fun with the mirror during the process:


Next, I hung some candle holders from pottery barn. They were actually a pretty good deal if you ask me...$34 for the set! It took me a while to find just the right candles for them and of course after I bought some others the perfect ones were in my house all along! These candles used to be in our entryway. I like the grey hue of them. They are subtle and complement the birds and flower pitcher.


Here are my birds from Hobby Lobby! I don't recall how much they were, but I did get them 1/2 off! They were actually my first purchase for the mantle. I was just drawn to them and sort of had to have them!!! And they kind of look like fish too?? Owell, I love them both;-)


And here is my clock that was the finishing touch. I knew I wanted something smaller, but just peeking over the mirror to go between the flowers and birds. I thought about a candle holder here, but I don't have a clock (like this) in the house so it worked out perfectly. This was 1/2 off from Hobby Lobby as well (love that place!). And I like that I can see what time it is without having to turn around and look in the kitchen:)


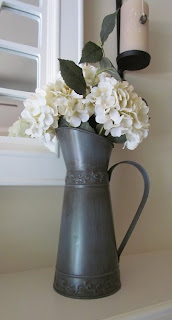
Lastly, here are my flowers and flower pitcher! I saw the pitcher from Michael's and fell in love. I thought the color was a perfect complement to the birds. And it was a good height to balance the other side of the mantle. The flowers were the hard part. I think I bought and returned 3 or 4 times...oops! Well, I wanted to get it just right! And I'm pretty happy with these. Yes, yes they are from Hobby Lobby too 1/2 off! I promise that is not the only place I shop, lol! Oh and I used my Michael's 40% off coupon for the pitcher. I think it was around $8 afterwards.


So what happened to those old tall candle holders you ask?? Do not despair...I was able to use them! My clever sister-in-law suggested I put them behind the fireplace screen and I loved it! She also suggested gold candles to pick up some other gold colors in the room. I think it's genius and I love that I can still use them.


So that's it folks. My mantle makeover in a nutshell! Or maybe not. Anyways, I think it has a beachy/country feel. Coastal meets country if you will. I love it, but may be changing it soon as it is pretty summery/springy to me. Maybe I'll do a fall/winter mantle!!!


Monday, August 15, 2011

Pet Candles

I was going to title this post "Pinterest Challenge", but quite frankly this was not challenging at all. It was pretty darn easy, actually! I recently redid my mantel and while doing so I bought a few too many candles...oops! It took me a while to find the perfect ones (and get this - they were in my house all along!). But since the candles I bought were so cheap I decided it wasn't worth taking them back. The other thing you need to know about is my birdcage. I've had it for a while and it sits on top of my armoire. I've always loved it as is, but lately I've been wondering if there was more I could do with it? Put something in it? Decorative balls? But I thought it was probably too big for that (and I have a smaller birdcage in my living room with decorative balls so I wanted to do something different). When I saw this picture on Pinterest I fell in love!


What a great idea! And so simple. So here is my more interesting birdcage:


What do you think? I love the different sized candles and how they are all in the white/cream family, but each one a slightly different color. Oh and when I showed my husband he said something along the lines of "Great, now we have pet candles". Lol. I think he secretly loves it!

Saturday, August 13, 2011

Sewing

One reason I picked the name Momma Sew Crafty for my blog title is because I'm learning to sew!


My wonderful hubby gave me a very nice sewing and embroidery machine for Christmas! My gift in return is to use it;-) I have slowly, but surely been taking classes and doing projects to help develop and strengthen my skills. I would definitely consider myself a beginner. My experience consists of some hand sewing when I was little and watching my Grandma sew while growing up. She is truly an artist and makes the most amazing, intricate quilts. Let's hope I have some of that sewing talent in my blood. My focus right now as far as sewing goes is curtains. For starters, I need some in my home! And I love that I can have the fabrics, colors, and patterns I choose! I'm also interested in making pillows, table runners, hand towels, and much more! Sew...I hope I live up to the name!


My First Curtain Project - A Roman Shade

Remember in my first post I said I wanted it to be current? Well there are some projects that I've done in the last few months that I would like to share with you that are, well, not so current. So I will do my best to recall the details.


My wonderful and talented Aunt Pat was kind enough to have me over for a curtain lesson! We decided a roman shade for my stairway would be a good project. I picked out some fabric that I liked and made sure it was light weight as she suggested would be best for a roman shade.
I brought my window measurements, sewing machine, fabric, and lining over so we could get started!

Measuring & Cutting:

The first thing we did was measure the fabric...several times (measure twice and cut once as the saying goes!). She had a handy cutting board so this helped us keep everything nice and lined up for the task at hand. We turned the fabric face-down on the cutting board and measured the width of my window (I wanted my shade to fit inside the window so I measured accordingly) and added 2.5" to each side (I'll explain why in a little bit). We used the yard stick to measure across and made little pencil marks all the way up the fabric. Then we connected the dots to make a line that was super easy to cut! As for the top and bottom of the fabric, that was much easier. We didn't have to be exact - we cut more than we needed so that I could have some room for error when I got home and did the finishing touches.

Fabric - Add 2.5" on each side. This will give a 1/2" for the seem and 2" for the fabric so it will not show on the sides.

The Lining:

Next we measured and cut the lining. We actually measured and cut it 1.5" shorter on each side than the actual width of my window. Remember how we cut the fabric two inches wider on each side? Well this was to make it so when we sewed the two together and pressed with an iron the finished product would match the width of the window. The reason for doing this is so when people walk by the window they will not see the white lining on the sides; it really gives it a professional touch! See the below picture that was shot from behind the shade.

Lining - Subtract 1.5" on each side from the window measurement. This allows for a 1/2" seem and to match up with the fabric.


Sewing:

Next it was time to sew! We pinned one side of the fabric and lining together (fabric face-down) on top of the lining and sewed a straight line all the way down! My Aunt suggested putting all the fabric in my lap and this little trick worked nicely! Then we pinned the other side and sewed. It was time to turn it inside out and iron! We adjusted the shade so that the two sides of fabric that wrapped around the back were pretty even and then ironed for a nice, clean line on the sides. We measured the width to make sure it matched up with the window measurements. And it did not. We had measured wrong somewhere, but I was glad because I got to see how to fix it! And it wasn't that big of a deal - all we did was take my seem ripper and undid one of the sides, did some more measuring/cutting, sewed it back up and voila! When we measured again it was the perfect size. I was glad to see that mistakes happen and it's easy to correct them.

The pockets & top stitch:

My Aunt had torn out a picture of a roman shade from a magazine that she thought we could make (yep, she had never made this kind of shade before and still did an awesome job!). It had pockets sewn in that you could put a rod of some sorts into. I used a small wooden dowel, but she said you can use metal or whatever you find. My Aunt did this part so I'll do my best to tell you what she did. I know she figured out how many pockets she wanted and divided the measurements to see how far a part each one would need to be. I think she measured about 11" between each pocket and marked on the fabric. And I think she folded the shade fabric facing fabric and sewed a half inch or more to make the pocket. See the picture above. And she repeated that for all five of them. Next she added a nice little touch by doing a top stitch on each pocket right above the fold. A trick to sewing this is to press down/pull lightly with both hands on either side of the fabric so that the stitch is right next to the fold and is even. It looked nice without a top stitch as well, but this was just such a nice touch and not too time consuming! It's hard to see in this picture, but if you look close you can see the stitching right above the fold:


Well folks, we were about done! At this point, I took the shade home with instructions from my Aunt on how to hang it up.

What I needed: Rings, cording, 2x4 piece of wood cut to the inside measurement of my window (cut it a little smaller to be safe), eye hooks, L-shaped hooks, curtain pulley, and fringe.


Rings & Fringe:
First, I sewed the rings on with a needle & thread at the top of each pocket. Then I sewed the fringe on top of the bottom seem. It was hard to pin and I wasn't sure what to do about the ends because it wouldn't fit under the needle of my sewing machine when I wrapped it behind the back of the curtain. So I cheated and used a little hot glue;-)

Stapling & Eye hooks:
Next, I stapled the top of the curtain to the wood with a wood staple gun. But right before this I went and held it up to the window to make sure it would fit and fall just where I wanted it. After that I screwed in the eye hooks to the wood. My Aunt said I could just screw them in with my hands if the wood was a soft enough and that blew my mind! But she was right; it worked like a charm! I did hammer it in to give it a start and then I screwed them the rest of the way by hand. This next picture is not my curtain (since it is already hanging up), but it's my Aunt's curtain that I used as an example. We used 3 eye hooks as you can see below.


L-shaped hooks & pulley:
Next, I screwed in the two L-shaped hooks. I made sure to staple the curtain and put on the hooks so that they would work in the window. I wanted the staples hidden so I made sure they were on the very top and I placed the L-shaped hooks so I could screw them straight up into the inside top of the window (mine was set up a little differently than my Aunt's example above). After that I screwed on the pulley to the side I preferred.

Cording:
It was time for the cording. This was pretty tricky. I cut my cording into two cords. One cord was longer because it had to feed through one side of rings and the top 3 eye hooks and hang down for pulling. The other cord was a little shorter because it did not have to go through the top 3 eye hooks. I tied a knot at one end of the longer cord and fed it through one side of rings and the 3 eye hooks at the top of the shade. I then tied a knot on the shorter cord and fed it through one side of rings. At this point both cords were at the top right-hand corner of the shade. It was time to feed them through the pulley. This was the hardest, most frustrating part because it was hard to see to get it going in the right direction, but finally something worked! I tested it to make sure the shade pulled up and down correctly and it did!!! Felt like a miracle. Then I had my two cords hanging down one side of the shade. I fed the handle (not sure what to call that thing) through and tied several knots so it would not come off after daily use. I actually did that part after the shade was hung so I could see where I wanted it to hang and then I cut and tied the knots.

I got a wooden dowel from Home Depot to slide into the pockets for some extra weight. I think the purpose is so that it pulls better when drawing them up. They cut it there for me for free! I put the wooden dowel on top of my Aunt's example curtain so you could see what it looks like. Check it out pictured above. And there it is! Happy Roman shade making!:)


Friday, August 12, 2011

Why did I start this blog?

Great question! I have so many answers.

Craft Blogs

Well, first of all my amazing sister, Alex, introduced me to craft blogs. And she encouraged me to start my own! I have been following a few of them for the last couple months and have been getting inspired and have seen so many great ideas!

Now and Then

I've been staying at home with my little girl for going on 4 months now. When my husband and I first bought our house I was so inspired to decorate! And I did a few things, but come on a house is expensive! And I was working full-time so I didn't have time or motivation to bargain shop, craft, and create. So I guess I kind of lost my inspiration lacking a budget and time to back it up. Now that I'm at home I feel like it's opened up my eyes to a whole new Susie homemaker world! First and foremost my focus is my daughter. After that I'm bursting with ideas to make my house into a home. So this blog is my outlet for all of that. I also owe my awesome sister-in-law, Robin, for my re-inspiration. Her home is beautiful and I love everything in it. She has shown me some great bargain finding spots and has given me lots of helpful tips.

My Biz

Before I left my job I started my own business on Etsy. In my shop I sold paintings and bow holders and had plans for much more. My Etsy shop is not history just yet, but it's definitely on hold. My initial reason for the break was to allow myself to ease into my new role as a stay at home mommy and to learn new skills so that I could eventually expand my business. I still have a dream of having my own business one day, but I would say that's not where my heart's at right now. I have so much I want to do for the house and myself that I don't want to spend what little spare time I do have on the Etsy shop.

Other

There are some other random reasons I think this blog is great idea. For example, to keep track of what I've done. I have so many ideas for the house I thought I should start a blog now and see the progress along the way! I often overwhelm myself with "To-Do" list and feel like I can never catch up. This will be a way for me to look back at my accomplishments and feel good about what I have achieved. I also want to share my ideas with others. I mean that's how I found out about doing this anyways - looking at other craft blogs. Share the love! And on the flip side, I would love feedback. What you like, what you don't like. Suggestions and information! Oh the many possibilities of the Internet! I wanted to call this blog "Finding my Niche" (but it was taken) because I know I love crafty, creative things but I want to see what I'm capable of and see where it takes me.


$5 Treasures from Ross

My first post - so exciting!!! I want to keep my first post current and simple. Today I found two little treasures at Ross for just $5 each!! This funky red frame and adorable tray.


I have big plans for them in the future (ok that might be an exageration), but for now I put them in the following places:


This is my new Hobby Lobby shelf that I found for $35. I bought it for the dining room, but it looked funny (I think I need a taller one for that area) so I stuck it in a nook on our stair landing. It's quite nice there. I'm looking for things to put on the shelves and I like the red frame here, but think it will eventually end up in the dining room (on that future taller shelf). However, it has already inspired me to get a red frame (maybe more simple and placed horizontally) for this bottom shelf. And I want to embroider something on the same red and yellow fabric of the curtain hanging above (stayed tuned for pics of that) and frame it!


I put my tray on top of the server in the breakfast area for now. I bought it with plans of placing it on my future table that will be in the entryway. It's a small area so the table will have to be narrow and this tray will fit perfectly on top (I hope)!