Tuesday, September 27, 2011

Refinishing Projects


One of my projects over the summer was refinishing some candlestick holders and a shelf that I scored at my in law's garage sale! And they just love me so much they give them to me for free:-) Thanks Harold & Denise!!! I so badly wish I had a before picture for you:-( It was a big transition! Basically they were both dark wood before. The candlestick holders had a slick coating so I sanded them down so the paint would adhere better. The shelf was pretty dull and large so I didn't bother sanding it. My in laws also gave me some left over paint they had from trying different paint colors on their walls. So thanks to them this project was free!! My plan was to paint and then sand down in some spots to give them a "distressed" look. I consulted a few people about the type of paint I was using for this project. Here's what I found out for your knowledge and mine in the future:


  • The paint used on most interior walls is flat. So if you want to have a finish that is more durable it's best to use satin.


  • There is paint specifically for furniture, but my project was small so what I had was fine.


  • When painting something that is oak (has the circles) you may want to use a primer as it will ultimately bleed through the paint giving it a yellow tint. I would think this would be more important if you're doing a bigger, more expensive piece of furniture.

I am really happy with how they both turned out. The paint on the shelf didn't stick as well as the paint on the candlestick holders. I think it's because I didn't sand it and the type of paint I used. But because I wanted a "distressed" look it will do just fine. If something nicks it and chips some paint owell it will just add to the look! Plus I'm putting it my guest room, which will get less wear and tear. I am by no means an expert on the subject, but wanted to pass my knowledge along! Tell me what you think!! I have not decided exactly where to hang the shelf yet, but my candlestick holders look fancy smancy in their new home. Stayed tuned for my next post to see them!!! I know the suspense is killing you;-) Here's a sneak peek...

Saturday, September 17, 2011

Cluelessly Planting!

Ok, not only do I not have a green thumb, I have a black thumb (is that the opposite of green?)!!! Let's just say I have not had much experience with plants and the little experience I do have is not good (I had a hard time keeping them alive). The only plant that I have kept alive (and it actually flourished) was the one I had sitting in my cube. It did so well because I walked past it everyday and remembered to water it! We have a couple plants in the house that have survived ok (mainly because my husband waters them). I am challenging myself to pot some plants around the house and maintain them! These empty pots are screaming for some plants!!


I headed to Pike Nursery hoping they could educate me a bit on the basics. I especially wanted to know which plants are good for inside/outside, low-maintenance, and will last all year long or at least come back the next year. I talked with a woman who worked there who was very knowledgeable and helpful. She started off by telling me about outdoor plants that need a lot of sun (because the spots I wanted to put them get a lot of sun). She recommended perennials because they come back every year, need little attention, and get lots of sunlight. Sold! I told her I had one large pot that I needed to fill. She suggested doing perennials or a shrub in the middle and adding a few smaller plants around it. She said a lot of people do a shrub in the middle so they have something in bloom year-round. But the perennials are a good choice too because they come back each year. She showed me some ivy that would be good for planting around the shrub or perennial. I liked the idea of ivy, especially how it would drape over the sides of the pot.

I actually set out to get a fern because I thought it would fit all of my criteria, but I wasn't sure. I saw an autumn fern when I was looking before I talked to the woman and she later confirmed it would be a good choice and would last all year long. She said it would "thin-out" in the winter, but something would still be there. It sounded good to me!

The plants I bought came in some soil, but I bought a bag of potting soil to add to them. The woman also suggested buying "Sure Start". She said it would ensure the plants have a healthy start so they would do better. I don't know if I got suckered in, but I thought it couldn't hurt since I need all the help I can get!

Outdoor plants:


Here's what I came home with from left to right:

  • Perennial - Mary Ann Lantana (I chose this particular one because she said hummingbirds like it)

  • Autumn Fern

  • Shrub - Boxwood Suffruticosa - Buxus Sempervirens

  • Ivy - Variegated Large Leaf Periwinkle


I gathered all my supplies (plants, planters, soil, Sure Start, gloves, and a shovel), put the gloves on and went to town. My husband said to break the plants up at the bottom. I mixed a little Sure Start (I just eye-balled it, but it tells you how much on the box) and soil and added it around the plants. I mainly used it to fill in the spaces around the large perennial and ivy in the big pot. I made sure it was filled close to the top and packed in pretty well. I was going to do the shrub in the big pot to have something year-round, but the perennial was bigger so I put it in the big pot and the shrub in the smaller pot. The fern and shrub fit pretty well and didn't need any extra soil. My plan is to ultimately have a nice little collection of plants in the corner of our deck. Remember those lonely little pots? Check out this after shot...aren't the pots much happier and isn't the corner much brighter now?!

After:


P.S. I'm pretty sure I will eventually have to re-pot the shrub. It barely fits and those things get pretty big, right??

The Fern:

I took a picture of the fern a few days later because it is out front and I forgot. Let's just say it's not doing so well...


Poor thing. I did just read that it needs more shade so I'm going to move it to the front porch and hope that helps. It has been getting water because it's been raining. We'll see! P.S. I got this urn for under $5 at a garage sale!!!

Indoor plant project/spray painting before & after:

Check out my $1 find at a garage sale last weekend! I thought it would look good spray painted red to go in my stairwell (where I have red accents going on).


Next, I got to spray-painting. Here's some pics during the process. Oh and yes, my hubby snapped this embarrassing shot of me in my socks and flops. I picked up this little trick from Young House Love, but I added the flops;-)


I only used one coat and it did the trick! I kind of like how the gold shines through just a little bit. It turned out pretty bright though so if I ever want it a little darker I may ad another coat or two. Some spray painting tips: Quick, even strokes and several thin coats. And this may be common sense, but it is hard to spray paint something that is black to white. I've tried a few times and it takes several coats and the black still shows through a little bit. Maybe there is a spray paint primer out there? I will look into it!

Now for the reveal!!!

Before & After:


What do you think? I love how it turned out! I only bought one indoor plant and wanted something small. I told the woman at Pike it would get some sunlight sitting pretty close to one of our windows. She recommended some ivy. She said it was very easy to take care of and would only need to be watered a couple times a week or whenever the soil is dry. This ivy is called "California" Hendera Helix.

Here it is all planted and getting settled in it's new home on the stair landing (remember in my first post when I was looking for stuff for this shelf?):


I love how the color pops and it makes me happy when I walk by! So there you have it folks - a step in the right direction! Hopefully I will keep my plants alive! I will do a follow-up post to let you know how they're doing and to hopefully introduce you to some new ones I've added!

Friday, September 16, 2011

Quilting/Patchwork Class

I took a quilting/patchwork class this summer and thought I'd share with you! It was a great class and I would definitely recommend it! I'm not really into quilts at this point, but my sister-in-law, Robin, told me about a deal on Groupon for a quilting and patchwork class at whipstitch (a fabric and sewing shop in Atlanta). Sew....I jumped on it! At this point in my sewing journey I'm open to all avenues to broaden my skills. It was 2 hours of jam-packed quilting and patchwork fun! I was definitely lagging behind most of the other students the whole time (there were about 10 of us), but I was proud that I kept up with them! And proud that I completed a mini quilt that I brought home! I am by no means the appropriate person to try to explain how I did this to you so I'm not going to try. However, I do have some ideas where I can incorporate my news skills; perhaps a quilted top ottoman cover or a pillow with some patchwork? I don't know - we'll see! And if/when I do these projects I'll give a tutorial so you can see how I did it.


Deborah Moebes instructed the class. She was an excellent teacher. She explained things in an easy-to-understand-way, but also kept the class moving right along schedule. During the class she mentioned her book. And I was starting to wonder who she was. I thought she just worked there part-time teaching sewing classes or something. So I asked her what her book was called and she said "Stitch By Stitch". Other people in the class were talking to her about her book and how they bought it. I also heard her mention how people often stop by the store looking for her. This really intrigued me and I wanted to know more. Students even brought their book for her to sign. After the class I saw her book for sale on the checkout counter. I flipped through the book and it looked pretty good; I really liked all the pictures that would be especially helpful to a beginner like me. I decided to buy it! I heard others in the class mention they had gotten it from amazon so I know I could have gotten it for less, but it was convenient and I wanted to take advantage of getting the author's signature!!! Here's a pic and I love what she wrote:-) For those of you squinting (probably everyone) she wrote "Best wishes for lots and lots of happy sewing memories!" Deborah.


I thought she might be the owner, but wasn't sure so I googled it just now and she is, indeed, the owner. In fact, I was reading the site here and it really hit a soft spot with me because I can totally relate. She is a woman after my own heart with her passion and entrepreneur spirit. I also thought it was really neat to read her first blog post here. This really hits home with me when she says "I can very clearly remember writing that first post, feeling like I was either starting something I’d never finish or setting my foot on a path that would whisk me away places I’d never imagined". I was (and still am) nervous about this blog. Mainly because I hate to be a quitter. I have high hopes that won't be the case and that it will help guide me in finding my dream. Oh and how awesome is it that the owner of the store teaches classes!?!! Very awesome and humble, indeed. I just love that - thanks for inspiring us Deborah!!! I will be back for more classes:-)

P.S. What do you think of my little quilt?? I didn't get to finish the sides -- that's on my "to-do" list;-)

Wednesday, September 7, 2011

Easy craft project you'll LOVE!

I saw this cute "LOVE" frame from pottery barn and well, I loved it! But when I saw the $149 price tag my love started to fade. And then I thought "hey, I can make that (and for a whole lot less)!". And at that point it was more of a challenge. I thought I could paint white letters on burlap or do something with scrapbook paper. I already had the scrapbook paper so I went that route. Here's how I did it if you'd like to make your own!


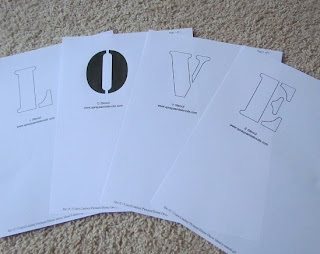
The first thing I did was Google “printable alphabet stencils” and the one I used was “Alphabet Letter Stencils” (the second one). Then I clicked and saved each letter - L-O-V-E. I made this for a collage in my daughter’s room so I didn’t want it too big. So I opened each file and resized the percentage from 100% to 75%. Then I printed them. Note: The pottery barn frame is bigger and if that’s what you want I would keep it at 100% or enlarge it more. Next, I cut the letters out around the whole letter (keeping the letter in one piece). I did this so I could trace the whole letter because I wasn’t sure what distance to leave for the spaces.


I thought about cutting the letters out of scrapbook paper and gluing them, but I wondered if I could paint the letters? Then I was so curious to see if it would work, that's what I decided to try! So I gathered up a piece of scrapbook paper, white acrylic paint, a white paint pen, and a paint brush. Note: I use AP approved (non-toxic) acrylic paint and paint pens.


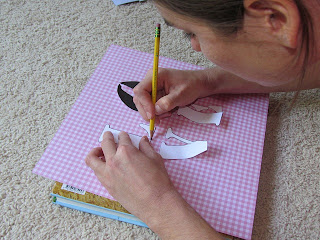
I placed the letters on the page where I wanted them and then taped them down with scotch tape to hold them in place. I traced around each letter to outline them.


Then I cut each letter on the remaining lines, lined them up within the outlines, and traced some more.


Here's a really bad, hard to see shot of the final outline:


I've never used acrylic paint and paint pen on paper so I tested it out in the corner of my scrapbook paper (I knew I would be cutting it later). I was glad to see that there was little to no warping. I used a pretty thick piece of scrapbook paper though. I'm not sure the thinner scrapbook papers would hold up as well (mine is similar to card stock and came in a book as opposed to the individual pages). Next, I traced the outline with a white paint pen.


It was time to paint! My technique was to keep the brush dry (if you use water in between make sure to dry with a paper towel before dipping back in the paint). I also made sure not to get too much paint on the brush at once and to use quick brush strokes! Acrylic paint dries fast, but apparently even faster on paper:-/ But all in all it was pretty easy!
Here are some shots during the process:


The first shot is after one coat of paint. I actually liked the faded look, but wanted the white letters to pop so I kept painting. The second shot is 3 coats. I was satisfied. The paint dries pretty fast, but I waited at least 15 minutes between each coat to be sure. After painting, I traced around the letters again with the white paint pen to re-enforce the border and give it a more finished look. Here's another shot of the finished product! I was LOVEing it;-)


The last piece of the puzzle was the hardest...finding a frame to fit it! Maybe I should have started there, lol! I would suggest making it easier on yourself and doing the letters bigger (100% as mentioned above) and using the whole scrapbook page. It is probably far easier to find a 12x12 frame (standard scrapbook paper size). Anywhoo...after much searching I found me a $5 frame from Ikea! I tested out a few other frames and decided I wanted something a little smaller than an 8x10. The Ikea Ribba frame is about 7.5"x 9.5" without the matte.

But the matte came in handy for cutting my scrapbook paper! I used it to center my art and simply traced around the outside so that when I cut it would fit perfectly inside the frame! Voila!


I framed it and here it is folks!!!! What do you think? I'm pretty happy with my $5 LOVE art as opposed to the $149 option. I already had the scrapbook paper, paint, paint pen, and paint brush on hand, but if you don't you can still make this for under $10.


Monday, September 5, 2011

Curtain Project #2


This is my second curtain project, but my first curtain project all by myself (if you don’t count the phone call to my Aunt wink wink)! Again, I apologize if some of the details are fuzzy as this was a few months ago. Don’t worry I will have a start to finish tutorial for my next curtain project!!! For this project I wanted to make something for the master bathroom. It’s pathetic, but we have had a temp shade up since we bought our house!!! It actually looked ok though. And I thought this would be a good beginner project because the window is a big square. I wanted another shade, but the window is so shallow (see picture below) that there is not a lot of room to mount one inside. So I thought I would make a shade with a pocket and hang it on a rod!


I was inspired by my sister-in-law’s kitchen curtains. They are adorable and tie up in a bow. I liked the look and wanted to do something similar here. However, as a beginner, I wasn't sure I was quite ready to have 4 strips of fabric lined up and sewn matching on the front and back, much less making the fabric ties! I thought about ribbon, but wanted something wider since this was going to be a pretty wide shade/panel. So when I bought my fabric at Hobby Lobby (on clearance) I was talking to the woman who worked there and she suggested ribbon. And she showed me some wider options. I had also thought about doing Velcro to make things easier on myself. So on second thought I decided to go with the ribbon and Velcro option! I felt a little bit like I was cutting corners, but whatever works!! So, I went home with fabric, lining, ribbon, thread, and Velcro to get started! My window measured just under the standard width of most fabrics so I was in luck! All I needed to worry about was the length and I bought a little more than my window height measurement to have plenty of room for the pocket at the top and the hem at the bottom. I would guess you would need at least 10” extra. And then of course I bought the same amount of lining. Check out my sis-in-law's curtains in the background and of course I'll sneak in a picture of my pumpkin (well, in this case my bumble bee!) whenever I can!!! She loves her Granny:)


I started out by measuring my fabric. I laid it out on my new cutting board (I bought one for a couple bucks at Wal-Mart after seeing my Aunt’s) to get it all lined up nice and neat. I ended up cutting a little from each of the sides leaving room for a ½” seam on each side. This project was a little easier because my measurements did not have to be exact. I just measured where I wanted the curtain to fall in front of the window. I liked it in the center of the molding around the window. It was nice doing this at my own house because I could hold it up to the window to make sure it was fitting along the way! After that I cut the top of the fabric leaving some extra for the pocket up top (for the rod) and the hem at the bottom. Next, I cut the lining. It was a lot easier because I took a short cut and laid the fabric on the lining and cut around it. I wasn’t sure how to do the next part and probably should have called my Aunt before I started cutting, but it ended up working just fine. I was trying to remember how we had done the roman shade. And if you read my post about my first curtain project you can get all the details, but basically I did this curtain the same way. I cut the lining a little smaller than the fabric so that the white lining would not show on the sides (the fabric would show). And I was confused on how we did it so I called my Aunt Pat. She cleared things up and I went on my merry way. I told her I originally thought I could do it like a pillow. What I mean is cutting the fabric and lining the same measurements, turning them facing each other, sewing 3 sides, and turning it inside out. She said that would have been perfectly fine in this case since it is not a window that gets much traffic and you don’t walk right next to it like the one going up our stairs. Had I known that, I probably would have done it that way to make it a little easier on myself. But I'm glad I did it this way giving it a nice, professional touch. And for this curtain I only did about ½” of fabric wrapping around the sides (shown below) so the lining was not that much smaller than the fabric.


Before sewing, I pinned one side of my fabric and lining together (fabric facing the lining). I sewed one side and then pinned and sewed the other. I turned it inside out and ironed the sides flat giving them a nice, clean line. Then, I realized I had no clue how to do the bottom of the curtain (the hem). I looked at the roman shade my Aunt and I did and realized I needed to fold the bottom piece up and sew straight across. I was nervous sewing this part because it was going to show. But I thought if it looked horrible I could cover it with trim, fringe or something! Side note: If I had done it like a pillow mentioned above the bottom would already have been done and look like the sides (something to consider). But it looked pretty nice so I let it be. Lastly, I sewed the pocket at the top of the curtain. I would advise sewing the ribbons on before doing this, but you can read below how I finagled it. I folded the top over (leaving about 2"), pinned, sewed, and was left with a pocket! I made a 2” pocket because I wasn’t sure what size curtain rod I was going to get and thought that should be plenty of room.


Sewing the ribbon & Velcro

I cut my ribbon in half making two strips. I trimmed one end of each strip very straight and sewed a seam to keep it from fraying. I also went ahead and sewed my Velcro on since it would be easier than after it was attached to the curtain. I tried pinning the Velcro, but it was pretty difficult since it was so thick. I just held it where I wanted it (centered at the bottom of the ribbon) and sewed. It was a little crooked, but wouldn’t show so it was ok. Next, I laid the ribbons on top of the curtain to figure out the placement and see if I needed to trim the ribbon. I eye-balled it and once I had them where I wanted I measured from the ribbon to the outside of the curtain to make sure they were symmetrical. When I had them where I wanted them I stuck a few pins about half-way up the curtain underneath each ribbon so I could sew the Velcro to the back of the curtain. I had to hold them in place somehow so I stuck pins straight up and down because they wouldn’t work the normal way but it was held enough in place for it to work. Hindsight I probably could have drawn a line with pencil and held the Velcro in place while sewing. My sewing went a little crooked so I ended up doing two seams and back-stitching at both ends so it would hold up for everyday use and they weren’t centered so I kind of had to so it would lay down flat.


It was time to sew the ribbons to the curtain! I lined them up again on top of the curtain. I made sure the bottom was even with the bottom edge of the curtain and left extra at the top so there would be enough to fold over and go past the seam. This was so I could sew beginning after the pocket (I did not want to close off the pocket and the rod not be able to go through). Next, I pinned (checking the back and front of the curtain at the pocket) and sewed a little shy of half-way down the curtain. I did this so I could use the loose ribbon to pull the curtain up during the day. The curtain only goes about half-way up so if I were to do it all over again, I would move the Velcro on the back of the curtain a little higher.


I held it up to the window and it fit! And I tested drawing up the curtain with the ribbons and Velcro and it worked and looked great so I was pleased!!! It’s not perfect, but I was pretty proud of my first solo curtain project!!:)


I ended up getting a small rod because all the larger rods stuck out too far from the wall. I wanted the curtain to hang as close to the window as possible (especially since there were no blinds or anything else covering the window). This one worked out nicely.