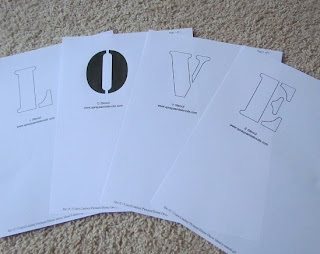
The first thing I did was Google “printable alphabet stencils” and the one I used was “Alphabet Letter Stencils” (the second one). Then I clicked and saved each letter - L-O-V-E. I made this for a collage in my daughter’s room so I didn’t want it too big. So I opened each file and resized the percentage from 100% to 75%. Then I printed them. Note: The pottery barn frame is bigger and if that’s what you want I would keep it at 100% or enlarge it more. Next, I cut the letters out around the whole letter (keeping the letter in one piece). I did this so I could trace the whole letter because I wasn’t sure what distance to leave for the spaces.

I thought about cutting the letters out of scrapbook paper and gluing them, but I wondered if I could paint the letters? Then I was so curious to see if it would work, that's what I decided to try! So I gathered up a piece of scrapbook paper, white acrylic paint, a white paint pen, and a paint brush. Note: I use AP approved (non-toxic) acrylic paint and paint pens.

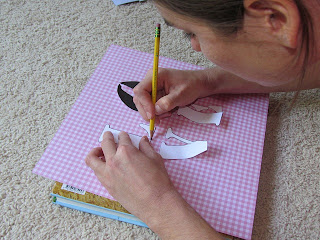
I placed the letters on the page where I wanted them and then taped them down with scotch tape to hold them in place. I traced around each letter to outline them.

Then I cut each letter on the remaining lines, lined them up within the outlines, and traced some more.


Here's a really bad, hard to see shot of the final outline:
I've never used acrylic paint and paint pen on paper so I tested it out in the corner of my scrapbook paper (I knew I would be cutting it later). I was glad to see that there was little to no warping. I used a pretty thick piece of scrapbook paper though. I'm not sure the thinner scrapbook papers would hold up as well (mine is similar to card stock and came in a book as opposed to the individual pages). Next, I traced the outline with a white paint pen.


It was time to paint! My technique was to keep the brush dry (if you use water in between make sure to dry with a paper towel before dipping back in the paint). I also made sure not to get too much paint on the brush at once and to use quick brush strokes! Acrylic paint dries fast, but apparently even faster on paper:-/ But all in all it was pretty easy!
Here are some shots during the process:


The first shot is after one coat of paint. I actually liked the faded look, but wanted the white letters to pop so I kept painting. The second shot is 3 coats. I was satisfied. The paint dries pretty fast, but I waited at least 15 minutes between each coat to be sure. After painting, I traced around the letters again with the white paint pen to re-enforce the border and give it a more finished look. Here's another shot of the finished product! I was LOVEing it;-)

The last piece of the puzzle was the hardest...finding a frame to fit it! Maybe I should have started there, lol! I would suggest making it easier on yourself and doing the letters bigger (100% as mentioned above) and using the whole scrapbook page. It is probably far easier to find a 12x12 frame (standard scrapbook paper size). Anywhoo...after much searching I found me a $5 frame from Ikea! I tested out a few other frames and decided I wanted something a little smaller than an 8x10. The Ikea Ribba frame is about 7.5"x 9.5" without the matte.
But the matte came in handy for cutting my scrapbook paper! I used it to center my art and simply traced around the outside so that when I cut it would fit perfectly inside the frame! Voila!

I framed it and here it is folks!!!! What do you think? I'm pretty happy with my $5 LOVE art as opposed to the $149 option. I already had the scrapbook paper, paint, paint pen, and paint brush on hand, but if you don't you can still make this for under $10.


It was time to paint! My technique was to keep the brush dry (if you use water in between make sure to dry with a paper towel before dipping back in the paint). I also made sure not to get too much paint on the brush at once and to use quick brush strokes! Acrylic paint dries fast, but apparently even faster on paper:-/ But all in all it was pretty easy!
Here are some shots during the process:


The first shot is after one coat of paint. I actually liked the faded look, but wanted the white letters to pop so I kept painting. The second shot is 3 coats. I was satisfied. The paint dries pretty fast, but I waited at least 15 minutes between each coat to be sure. After painting, I traced around the letters again with the white paint pen to re-enforce the border and give it a more finished look. Here's another shot of the finished product! I was LOVEing it;-)

The last piece of the puzzle was the hardest...finding a frame to fit it! Maybe I should have started there, lol! I would suggest making it easier on yourself and doing the letters bigger (100% as mentioned above) and using the whole scrapbook page. It is probably far easier to find a 12x12 frame (standard scrapbook paper size). Anywhoo...after much searching I found me a $5 frame from Ikea! I tested out a few other frames and decided I wanted something a little smaller than an 8x10. The Ikea Ribba frame is about 7.5"x 9.5" without the matte.
But the matte came in handy for cutting my scrapbook paper! I used it to center my art and simply traced around the outside so that when I cut it would fit perfectly inside the frame! Voila!

I framed it and here it is folks!!!! What do you think? I'm pretty happy with my $5 LOVE art as opposed to the $149 option. I already had the scrapbook paper, paint, paint pen, and paint brush on hand, but if you don't you can still make this for under $10.


I think I am going to do this one too!!! I really like it. I think it would be perfect in my guest room.
ReplyDeleteThanks Heather! You totally should:-)
ReplyDelete