Although it is after Christmas, I still wanted to post this because, well, there's always next Christmas! Also, this banner can be done in any colors/patterns so get creative and make one for your next party or holiday! There's New Years, Birthdays, Valentine's, etc., this banner is perfect any time of the year. And let me just mention it is a GREAT beginner sewing project!!! It was actually the first time I sewed something other than a straight line!;-) And I did so many scallops it was good practice. This was not the quickest project, but it was not very difficult and, like I said it, made for great practice! I'm the type of person that doesn't like to just "practice", so having a goal/project in mind is right up my ally!
Let's get started!
First, I drew a scallop shape on the back side of my fabric. If you don't feel comfortable doing it freehand, look for something in your home to trace. But the nice thing about this project was the scallops did not have to be perfect.
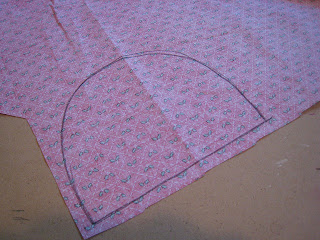
I cut it out and used it as my template to do the rest of them. Here are two all cut out to make one scallop!
Then I placed them facing each other...
It was almost time to sew, but since I did them freehand I held them up to see if they were even and did a little trimming in spots where they were not.
Time to sew! I did a couple back stitches at each end to ensure they would not come apart when turning them inside out.
Here it is all sewn together! Not perfect, but you can't tell once you turn it inside out.
See...one nice scallop!
I ended up making 18 scallops (half red, half green) to cover my mirror above the mantel. As you can see there is an unfinished edge, but it will be taken care of once we sew it on to the ribbon!
I pinned 6 scallops at a time to thin white ribbon. Then I got to sewing! I went very slowly sewing this part to keep it lined up and centered, but do what you're comfortable with! And I took the pins out as I went since they held more securely pinned sideways and not straight up and down.
I left gaps in my banner so there would be room to tape the ribbon up on the sides...but after much rearranging, I ended up cutting them all separate to make hanging a bit easier!
What do you think? Are you going to try it? Keep in mind you could do one long banner to hang across the mantel or down your stair banister? I'm pretty sure my inspiration for this project came from here:
http://tatertotsandjello.com/2011/11/thanksgiving-countdown-bunting-tutorial-and-28-grateful-activities.html
Hers is neat because it has pockets you put activities for the family to do together in! Maybe I could add some pockets to mine and make an advent calendar?? We'll see!
Thursday, December 8, 2011
Christmas Tree Tutorial!
I was loving all the cutesy trees on Pinterest so I decided to make some of my own! They are proudly displayed on my Christmas mantle!! But you will have to wait just a bit longer for that debut!;-) Anywhoo if you like what you see and want to make some of your very own here is a step-by-step tutorial of what I did. This project was fun, easy, and didn't take very long at all!
I picked up some Christmassy fabric that stood out to me at Hobby Lobby and also a couple of Styrofoam cones, and ruffly ribbon. The foam cones were a little pricier than I had hoped (I think $5.99 & $6.99), but I did use a coupon so that helped. My SIL told me they have them at Wal-mart so check that out for a cheaper price. I also read here how this lady did hers with poster board!! So cheap...I'm so going that route next time!
Step one...gather your Elmer's white craft glue, fabric, and cone(s). I simply laid my cone at one edge of the fabric leaving a little room at the top. I put glue along the edge as shown below:
I lifted the fabric towards the cone and pressed it down. Next, I put glue along the other side:
Then I rolled the cone onto the glue...
I repeated this rolling and gluing method until it was fully covered in fabric. But I actually rolled and glued some more so the fabric would be glued to fabric assuming it would stick better to itself than the Styrofoam.
After that, I cut roughly around the cone freeing it from the rest of the fabric (not worrying about being neat).
Next, I cut as close as I could to the tree, but I didn't worry too much about a straight, clean line. I knew I was going to put ribbon over it and could always have that part be the "back".
Then I laid my trees out to dry. I put them on top of a cardboard box because I could feel the glue coming through and didn't want to mess up a nice surface. I let them dry overnight, but I'm sure they would be fine after an hour or so. I didn't have a chance to work on them until the next day, but I also wanted to make sure the glue was good and dry because I was a little afraid it wouldn't stick very well. But it did and I was so glad!!! I didn't want to use hot glue as I was afraid it would melt the Styrofoam, so I was thrilled good ol' craft glue worked!
It was time to trim the tops and bottoms! I cut the bottoms along the edge until I had smooth, clean lines...I suppose wrapping the fabric around the bottom and hiding the Styrofoam may have looked a bit nicer, but I wanted them to sit flat so I went this route.
As for the tops...I snipped the fabric until there was about an 1" left and folded it down section by section until it was flat (about 3 sections) and hot glued them on top of each other. It's not the neatest, but it did the trick! If I had pins with red or green balls at the top I probably would have pinned it down. Just another idea:-)
Sorry I didn't get any "during" shots of doing the ribbon...it was probably the trickiest part. I did use hot glue for the ribbon since it was being glued to the fabric and not the Styrofoam. I started at the top and wrapped it down the cone. My method was doing a dot of hot glue and then wrapping the ribbon a little ways and another dot of hot glue and so on and so forth. It was challenging getting the ribbon evenly spaced and angled right. My green tree is a little better than than red tree. But I like how they are different and I like to think of my red one as "whimsical", lol!
So there you have it ladies and gents - custom made Christmas Trees!! Stayed tuned for the matching banner tutorial!!!
Oh Christmas Tree, Oh Christmas Tree!
Monday, December 5, 2011
GIVEAWAY!!!
Yay, my first giveaway!! One lucky person is going to win this adorably cute candle holder from Hobby Lobby!! If you read my last post here you know that I'm really into candle holders lately and finding creative spots for them in my home! Where will you put this beauty if you win? Perhaps a small nook somewhere or in the bathroom (remember all that over the potty talk, lol)? Here it is shown hanging on the wall:
Here's how to win:
1.) Follow my blog
2.) Leave at least one comment on ANY post.
I will literally be drawing names out of a hat to pick the lucky winner next Monday! I will be announcing the winner in this same post so check back in a week! Make sure I have a way to get back in touch with you...if I don't have your contact info. please leave your e-mail address in your comment.
P.S. If you already follow my blog and have commented before, you are automatically entered to win:-)
Thank you and good luck!
And the winner is........Congratulations Robin!!!
Lindsey
Monday, November 28, 2011
Thrifty Finds
Well folks, while I'm hard at work on my Christmas mantle I thought I would share some of my thrifty finds over the last several months with you!
As I mentioned in one of my first posts here, my sister-in-law, Robin, has shown me some great bargain finding spots and has given me some great tips! She took me to one of her favorite thrift stores...the local Goodwill. We have gone quite a bit and have found some great treasures for cheap! We've also scored some great deals at local garage sales. So here are some of my favorites! I will try to remember the prices for you, but just to give you an idea, most of the things I have bought from GW were around $4. Sometimes less, sometimes more, but the most I have spent is $9. And that was on a good sized picture. Let me start with one of my more recent finds that I love!!
I scored two SLAH (Southern Living at Home) sconces at a garage sale for $3/each. I am a huge fan of SLAH (now Willow House) so I was thrilled! I'm using them as shelves right now, but you can also take off the tops and put flowers or whatever in them!! My SIL actually has these as well and she has flowers in hers:-) Oh and I scored the two plates for a $1/each at a garage sale as well to go above them! I love how it turned out. The plates caught my eye because the colors go well in my living room. I also found them neat because they have French writing on them. I got a pig and goose. I already had the artichoke candle holders and I think they go quit well with them! And I switched them out for pumpkins in the fall:-)
One of my first GW finds was the above candle holders. They were originally brass and I spray painted them. My SIL told me about the Rustoleum hammered finish spray paint that she uses a lot! I tried it and was in love! I have used it on several things:-) Update: I recently broke one of these candle holders so I will have to find the remaining one a new home:-( I see some rearranging in my future! But my SIL has given some good suggestions...putting it in a little nook or small wall, separating two pictures with it, or putting it in the middle of a grouping of shelves. I'll let you know what I do!
Ok, these candle holders from GW are probably my favorite treasure find yet. I just love how they look in my dining room! And they're not something you can just go out and buy! They were pretty easy too because they were already spray painted! And it's funny because they look like they were spray painted with the same Rustoleum hammered spray paint I had been using! So all I had to do was touch them up a bit in some spots where the gold color was shining through. They make me happy when I walk by!
My SIL encouraged me to get this guy when we were at GW. I was apprehensive at first; I liked it, but it was big and I didn't know where I would put it? I decided for $4 it was worth a shot! She even suggested putting it over the toilet! So, that's exactly what I did! And I loved it!! I think what I like most about it is how unique and different is.
Well, I'm not sure how these finds ended up together on my list, but here they are both proudly displayed above the potty (that's my mommy talk)! I love this green glass thing I found at Goodwill! I say "thing" because I'm not quite sure what it's supposed to be? Candle holder? Vase? Whatever, I love it! And I'm currently using it as a candle holder:-) Side note: the Eiffel Tower pic is from an Estate Sale I got a couple years ago and the shelf was 50% off at Hobby Lobby. I'm not sure you can really tell in the picture, but the shelf looks great over the toilet! How did all this turn into potty talk, lol?!
P.S. Sorry the bathroom pics are not very good - it is challenging with no natural light coming in!
Ok, I just realized these are all pretty much candle holders, lol! I am obsessed. I blame Robin;-) Stay tuned because in the spirit of candle holders I may just be giving a very cute, trendy one away soon!!! And don't forget to check back for my Christmas mantle and a little something extra - my mistletoe balls!!
Friday, November 18, 2011
Candle Coozies!
Here is a quick and easy way to spruce up your candles! I loved this project particularly because it was quick, easy, and free! I'm not exactly sure how I came up with it...maybe it was all those times walking past the candles thinking "they're cute, but could I add a little something to them?", or my recent obsession with burlap, or was it that vase I saw in passing on pinterest that was decorated all cute with some burlap tied around it?? Not sure, but here it is!
This project was free because I had the burlap, ribbons, and buttons on hand. I knew saving ribbon scraps and extra buttons that come on clothing would come in handy one day!
It was so easy there's really no need for a tutorial; here's what I did:
-Cut the burlap width by judging how much candle would show and the length by wrapping it around the candle
-Cut the ribbon the same length
-Hot glued burlap ends together
-Hot glued ribbon ends together
-Hot glued button centered on front
Here's a picture so you can see all the gluing going on in the back:
And here's a close-up of each one...you're probably wondering why they are different? Well I couldn't make up my mind which way I liked more! So I did one with the extra green shimmery ribbon and one without. When I ask my husband if he likes something he often says "let it play". Not sure if that's his way of minimizing the conversation of the topic (lol) or whatever, but it has actually been pretty good advice! If I'm not sure if I like something somewhere I just "let it play" for a few days and it really helps me make up my mind. So...not that this is a life changing decision or anything, but I like them both ways so I'm going to let them play for a little while:-)
Here's a good side-by-side shot for comparison. I like the simplicity of the one on the left, but I like the way the green shimmery ribbon creates an outline for the thinner ribbon of the one on the right.
I didn't set out to make candle coozies, but that's kind of what they are! I wrapped them pretty tight when gluing them, but they still slide off the candle pretty easily. I guess it's a good thing in case I don't like them anymore or want to change them out to another candle!
What do you think of the candle coozies? Which do you like better out of the two? Are you thinking about making some for those naked candles in your home??:-)
Subscribe to:
Posts (Atom)